$ wget http://download.jboss.org/wildfly/8.1.0.Final/wildfly-8.1.0.Final.tar.gz
In this article, I would like to document how to set up a load balanced high availability standalone cluster.
For domain cluster refer to WildFly 8 Clustering Howto
Preparation and Scenario
We need to prepare two hosts for this. We will assume that the following conditions are satisfied
-
Two Nodes with *Nix installed
-
Make sure that they are in same local network
-
Make sure that they can access each other via different TCP/UDP ports(better turn off firewall and disable SELinux during the experiment or they will cause network problems).
Scenario
-
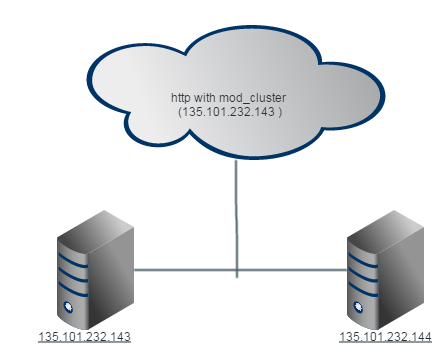
We are going to install 2 standalone instances of WildFly - Let's call them Server One and Server Two
-
Both servers execute the full-ha profile
-
Apache httpd will be run on Server One and in httpd we will enable the mod_cluster module. The WildFly 8 on both the servers will form a cluster and discovered by httpd.
Download WildFly 8
First we should download WildFly 8 from the website:
Next untar the downloaded zip
mkdir ./wildfly;tar -xvf ~/wildfly-8.1.0.Final.tar.gz -C wildfly --strip-components=1
The above command will untar the package in to the wildfly directory
On changing to the wildfly directory and listing the directory structure, you should see the below structure
bash-4.1$ cd wildfly/
bash-4.1$ ls
appclient  bin  copyright.txt  docs  domain  jboss-modules.jar  LICENSE.txt  modules  README.txt  standalone  welcome-content
Starting Wildfly in Cluster Configuration
Starting the wildfly instance can be done using the below command on Unix on both the servers
./standalone.sh -c standalone-ha.xml -b=$HOSTNAME -bmanagement=$HOSTNAME -u 230.0.0.4 -Djboss.node.name=$HOSTNAME
Here the -c option specifies the configuration file to use. We are going to use the High-Availability setup
The -u option describes the multicast address. It is using this IP both servers communicate.
For ease of setup, I have included the $HOSTNAME in the nodename and start up options
For windows User, replace the $HOSTNAME with %COMPUTERNAME%
Please note that you should be in wildfy/bin when you execute the above command
You should observer similar output
=========================================================================

  JBoss Bootstrap Environment

  JBOSS_HOME: /opt/app/wildfly

  JAVA: /opt/app/java/bin/java

  JAVA_OPTS:  -server -Xms64m -Xmx512m -XX:MaxPermSize=256m -Djava.net.preferIPv4Stack=true -Djboss.modules.system.pkgs=org.jboss.byteman -Djava.awt.headless=true

=========================================================================

15:00:42,515 INFO  [org.jboss.modules] (main) JBoss Modules version 1.3.3.Final
15:00:42,845 INFO  [org.jboss.msc] (main) JBoss MSC version 1.2.2.Final
15:00:42,943 INFO  [org.jboss.as] (MSC service thread 1-5) JBAS015899: WildFly 8.1.0.Final "Kenny" starting

......

15:00:47,028 INFO  [org.jboss.as.messaging] (MSC service thread 1-1) JBAS011601: Bound messaging object to jndi name java:jboss/DefaultJMSConnectionFactory
15:00:47,087 INFO  [org.jboss.as] (Controller Boot Thread) JBAS015961: Http management interface listening on http://135.101.232.143:9990/management
15:00:47,087 INFO  [org.jboss.as] (Controller Boot Thread) JBAS015951: Admin console listening on http://135.101.232.143:9990
15:00:47,088 INFO  [org.jboss.as] (Controller Boot Thread) JBAS015874: WildFly 8.1.0.Final "Kenny" started in 4954ms - Started 232 of 359 services (175 services are lazy, passive or on-demand)
Installing & Configuring Apache Httpd
Download Apache httpd
Get the httpd from the JBoss downlode site:
wget http://downloads.jboss.org/mod_cluster//1.2.6.Final/linux-x86_64/mod_cluster-1.2.6.Final-linux2-x64.tar.gz
This version is pre-configured with all set up necessary to run mod_cluster out of the box and connect with JBoss
If you already have HTTPD installed, then, please get the following archive and untar
wget http://downloads.jboss.org/mod_cluster//1.2.6.Final/linux-x86_64/mod_cluster-1.2.6.Final-linux2-x64-so.tar.gz
The httpd and it's associated configuration assumes that the server will be installed in /opt/jboss/httpd.
If you do not follow this path structure, then the configurations do not work.
On *nix, you can use the ln command to create a symbolic link to /opt/jboss/httpd and configure as needed
Sample as listed below
/bin/ln –s /opt/app/myapp/httpd /opt/jboss/httpd
Configuration
The main configuration for the server would be under the
$SERVER_ROOT/httpd/httpd/conf
Ensure the Listen directive is setup appropriately.
Listen 135.101.232.143:8081
At the end of the file ensure that the mod_cluster directive are appropriately setup
<IfModule manager_module>
  Listen 135.101.232.143:6666
  ManagerBalancerName mycluster
  <VirtualHost 135.101.232.143:6666>
    <Location />
     Order allow,deny
     Deny from none
     Allow from 135.101.232.
    </Location>

    KeepAliveTimeout 300
    MaxKeepAliveRequests 0
    #ServerAdvertise on http://@IP@:6666
    AdvertiseFrequency 5
    #AdvertiseSecurityKey secret
    #AdvertiseGroup @ADVIP@:23364
    EnableMCPMReceive

    <Location /mod_cluster_manager>
       SetHandler mod_cluster-manager
       Order allow,deny
       #Deny from all
       Allow from all
    </Location>
 ProxyPass / balancer://mycluster/


  </VirtualHost>
</IfModule>
Save and exit.
Now, execute Apache via the following command
/opt/app/jboss/httpd/sbin/apachectl -k start
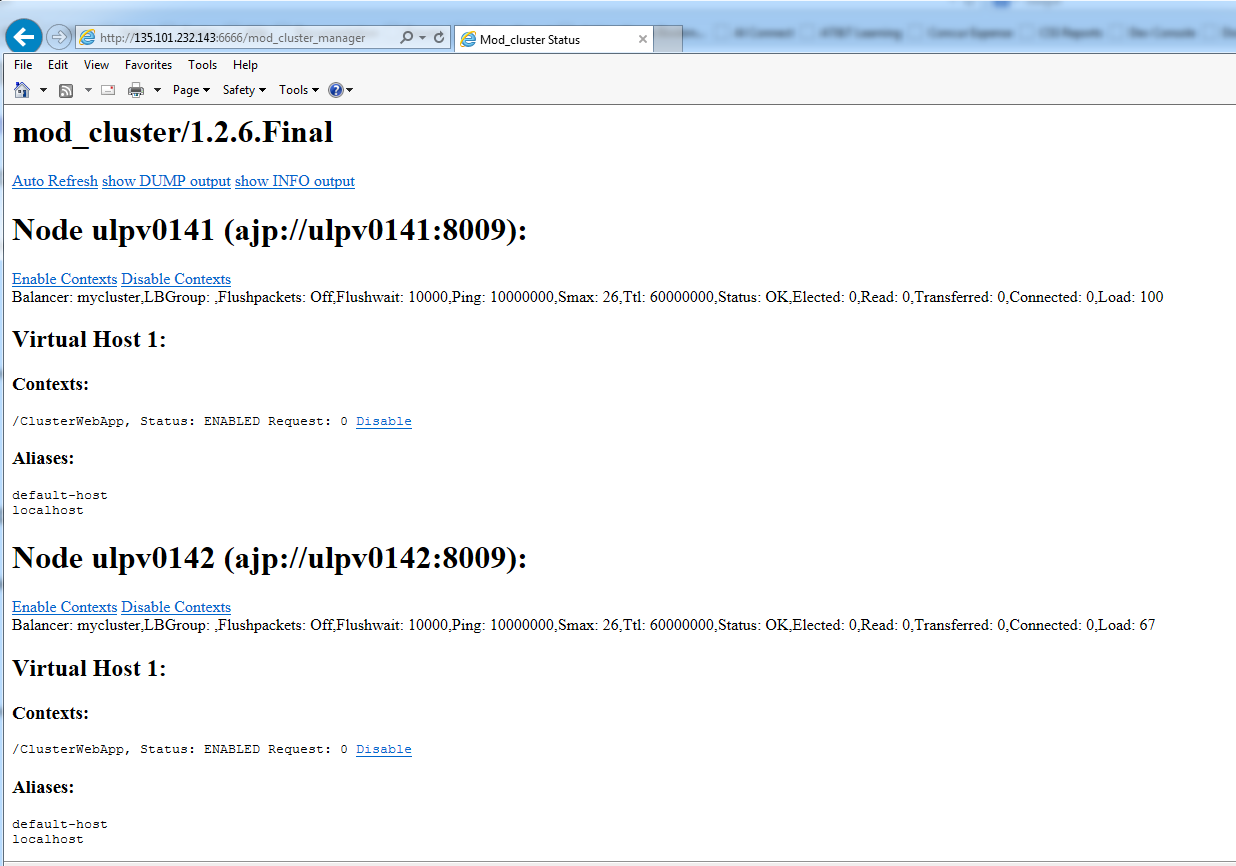
Verify by opening the url: http://<IP>:6666/mod_cluster_manager in your browser
You should see something similar to this: